Contributing
Main Table of Contents
General
Welcome
Contribute: Generate Wiki pages from Text Files
Wrye Bash Related
Wrye Bash Features
Wrye Mash Usage
General Usage
Advanced Usage
Technical References
Tome of Alt3rn1ty
Morrowind Related
Morrowind And Beyond
TES Plugin Tool (TESTool) 1.3 Docs
Oblivion Related
Tome of Psymon - BAIN Mod Installation Projects
Oblivion And Beyond
Intent
• Do you have Wrye Bash related material that you would like to submit to this site? Are HTML and css style sheets over your head? The files and options provided will allow you to edit a simple text file that I will convert into content for the Wiki.
• Optionally if you would like to see what your work will look like on-line I provide an optional Python script that will generate HTML and allow you to double click the file from the windows explorer and see a very close approximation of what it will look like.
• Wrye has said in some of his Wrye Mash files that he built all of his pages using this system. I would presume that Wrye Musings was done this way as well. On this page you will be shown the Wrye Text format and given a download of a python script to run and convert your Wrye Text files to HTML that can be used on this site.
You do not need to know Python or HTML to contribute. The syntax of the text file is explained below along with optional instructions on how to install Python to use the script provided.
What content would be accepted?
• Content should be Wrye related and related to Wrye Mash, and Wrye Bash programs. This can include BAIN installers for mods that do not currently have any or any other content that users could benefit from when using Wrye Bash.
• Mod lists and modding guides are also acceptable.
• There are many mods that are a must have so guides will include most of these mods. Try not to duplicate other content when possible.
Contents
• 10.1.1 Download pagebuilder_v21.zip
• 10.2.19 Other Formatting & HTML Elements
• 10.2.23 Adding an Image with a Caption
• 10.2.24 Adding an Image with Caption and Hyperlink
• 10.2.25 Adding an inline Image
• 10.3.1 21.00 Update [2/18/2020]
• 10.3.2 20.00 Update [1/27/2020]
• 10.3.3 19.00 Update [1/26/2020]
• 10.3.4 18.00 Update [1/25/2020]
• 10.3.5 17.00 Update [1/25/2020]
• 10.4.2 Where are the files I just downloaded?
• 10.4.4 Installing Python script for use
• 10.5.1 License: WML 1.0 Modify and Redistribute, Share Alike
10.1 - Requirement
• The pagebuilder_v21.zip contains all the files shown. However, in the future it may contain other files as well. As the file changes, the file name will have a version number added to it that you can compare to your copy. Then you will know if you have the most recent files.
10.1.1 - Download pagebuilder_v21.zip
• pagebuilder_v21 Download Link.zip
10.1.2 - Example Template
As part of the pagebuilder archive you have Wiki Page Template.txt. This will be the file you will modify as desired for the wiki content you wish to present. I will convert it into usable HTML after you are done and you may update the content and submit the changes.
10.2 - Syntax
10.2.1 - Your Pages Title
Your page title will become the first line on the page and will be assigned as the first header. To indicate this text use the following Wrye Tag. Add {{PAGETITLE="Your Page Title"}} with opening and ending double curly brackets. The text in quotes will become the title of your page as shown below.
Your Page Title
10.2.2 - Heading Style 1
• There are 4 levels of headings defined with different sizes of text and backgrounds.
• The level of the heading is determined by number of leading '='s. Trailing equal signs are ignored.
• These headings will have some shade of grey bar that extends the width of the page.
Heading 1
Heading 2
Heading 3
Heading 4
10.2.3 - Heading Style 2
• Like the previous heading the amount of leading '#'s determines the level of the heading.
• These headings will not have a bar as a background and will have green text
Heading 1
Heading 2
Heading 3
Heading 4
10.2.4 - Table of Contents
A table of contents is automatically generated from the headers in the document. It is best to place the first content tag where you want the table of contents to be, and after a header named Contents. The number indicates the level of headers used. You should not use H1 except at the beginning of your page.
In addition to building a table of contents, both the headers and the table of contents will be numbered automatically. It is not necessary to number the headers manually because they will be renumbered automatically as well. The numbering relies on the numer at the begining of the file name. For exmaple all the numbers will start with 6.x if the file name is 6-yourpagename.html.
A value of two would use H2 headers:
• H2 Heading
• H2 Heading
• H2 Heading
A value of three would include H3 headers as well:
• H2 Heading
• H3 Heading
• H2 Heading
A value of four would include H4 headers:
• H2 Heading
• H3 Heading
• H4 Heading
• H2 Heading
The syntax is as follows: {{CONTENTS=2}} or {{CONTENTS=0}} to pause using headers in the table of contents.
You can also disable using headers in the table of contents by using a value of 0. The headers will not be recorded until there is another contents tag with a value greater than 0.
You can only use one value for the document. Meaning if you use the value of 2 you can not use 3 and later 4 and then later 2 again. Instead use headers in a meaningful way or omit the header by using a 0 value contents tag.
10.2.5 - Bullets
• Bullets1 - an asterisk * and a space would precede the text
• Bullets 2 - two spaces and an asterisk * would precede the text
• Bullets 3 - four spaces and an asterisk * would precede the text
• Bullets 4 - six spaces and an asterisk * would precede the text
• Bullets 5 - six spaces and an asterisk * would precede the text
• Bullets 6 - six spaces and an asterisk * would precede the text
+ Alternate bullet char - a plus and a space + would precede the text
o Alternate bullet char
For an invisible bullet char you would use a period . at the beginning of the line.
10.2.6 - Styles
• Italic - You would surround the text using two tilde ~ symbols
• Bold - You would surround the text using two underscore _ symbols
• BoldItalic - You would surround the text using two asterisk * symbols
10.2.7 - Header Rule
There are two ways to make a Header Rule to separate content. The traditional HTML <hr> tag and by adding 4 hyphens ---- at the beginning of a line.
The above white line used the 4 hyphens ---- as the syntax.
10.2.8 - Navigation Buttons
You can add Navigation Buttons to your document to help your reader navagate to other pages or sections on the same page. Below is the syntax for two buttons. The buttons will be arranged horizontally unless on a phone where they will appear vertically.
{{nbb}}
    [[https://wrye-code-collection.github.io/wcc-wiki/index.html | wcc-wiki]]
    [[https://sharlikran.github.io/ | Sharlikran]]
{{nbe}}
Will produce dark teal buttons like this:
All Wrye Text link syntax is vallid.
10.2.9 - Extra Navigation
If you need to link to another part of a page or a different page then you can insert a navigation anchor. The anchor should be placed above the text you want to link to. That way once you click the link the page will move to the anchor and text (where you placed the anchor) will be positioned at the top of the browser.
{{nav:gotohere}}
Once you add the navigation link you will need to make a link for users to click on to navigate to the anchor. To do so you need the link to start with # Simply add that somewhere in the document above where you want the anchor
[[#|gotohere]]
Click this link and it will jump to the Version section so you can see what happens with this type of anchor.
The anchor does not start with a #. However, the link to the anchor must start with a #.
10.2.10 - Links
There are different ways to add a hyperlink to other content. The two examples that will be internal and external links.
External Link: [[https://wryemusings.com/]] or [[https://wryemusings.com/ | Wrye Musings]]
https://wryemusings.com/ or Wrye Musings
Although the syntax is different they function the same. The difference with the second example is that it has link text. To specify link text you separate the hyperlink and the link text with a pipe | symbol which you get by using SHIFT + \.
Internal Link 1: [[#Python Installation | Python Installation]]
Internal Link 2: [[#| Reuse and Credits]]
Internal Link 3: [[#ExtraNavigation | Extra Navigation]]
Internal Link 1: Python Installation
Internal Link 2: Reuse and Credits
Internal Link 3: Extra Navigation
There is no functional difference between the three examples. They will all link to another part of this document. One slight difference is that in the first two examples the text on the left side of the | has a space. The site builder will automatically convert that to a valid internal link. For a valid internal link you only need to specify the name of the header. The main benefit of this syntax is that as long as the header name does not change, it will not matter what other headers or sections of the document you add or remove. An internal link will always be valid as long as there is a matching header of the same name.
If you duplicate a header name a number will be appended to make the anchor unique. When that happens an internal link to a header will fail unless you specify the exact anchor produced by the pagebuilder. You will need to examine the HTML file generated.
10.2.11 - Text Colors
There are 16 dark themed colors (17 if you count black) for you to choose from so they are not (at least to the best of my abilities) as blinding as their regular values. To use these colors you need to use the outdated HTML tag font. The tag needs to have the proper open and closing tag, and the name of the color will be assigned to the word class within quotes.
<font class="green">This is green</font>
• This is black
• This is blue
• This is brown
• This is cyan
• This is dkgray
• This is gray
• This is green
• This is ltblue
• This is ltgray
• This is ltgreen
• This is orange
• This is pink
• This is purple
• This is red
• This is tan
• This is white
• This is yellow
Obviously some colors will not contrast that well against this dark background but would look much better against a lighter background.
10.2.12 - Link Colors
You may be contributing a guide that has people download a mod and you wish to color code them to indicate a special purpose. Maybe the file needs to be converted from Skyrim to Skyrim SE or maybe the mod has special install procedures that make it complicated for new users. Whatever the case may be there is a tag that you may use to indicate the link color.
{{a:green}} in the link's name field will be used to color the link green.
[[https://github.com/Sharlikran | The Link Text Will Be Green{{a:green}}]]
The tag must be with the link name or it will be ignored.
10.2.13 - Link Titles
Link titles can be used to display a brief description about the link.
[[https://github.com/Sharlikran | The will be the Link Text{{title:This will be the brief description}}]]
The title text must be with the link name or it will be ignored.
10.2.14 - Tooltip Text
Tooltip text can be used to display extra information you want people to know and eliminate some clutter on the page.
{{tooltip:This is the text users will see. | This is the tooltip text.}}
This is the text users will see.
This is the tooltip text.
Tooltips should be brief descriptions of the information and not long paragraphs.
10.2.15 - Html
• Html tags work fine
• code tag has special formatting
• pre tag is useful for code
begin widgetScript
short counter
end
Refrain from using too many HTML tags if you know the language well. If special styling is needed I can look into a way to provide additional options. However, I would like to keep this custom markdown language as simple as possible so it doesn't become another type of HTML.
10.2.16 - Blockquote
To add a blockquote tag you will need to specify an author for the blockquote. To do so simply add the author name after the colon : symbol. This will be converted into the authors name and placed at the top of the blockquote.
[[bb:Quote]]
Example of text in a blockquote
[[be:]]
Quote
This is quoted text from another author.
You can also put a blockquote around text for other reasons.
The title of the blockquote can be assigned the author of the quote or even just the word Quote.
10.2.17 - Spoiler Tags
To add a spoiler tag you will need to specify both an ID for the spoiler and the spoiler name separated with a pipe | symbol. This will connect the spoiler contents, name, and the button.
[[sb:Spoiler1 | Spoiler Name]]
Example of text in the spoiler tag
[[se:]]
Example of text in the spoiler tag
10.2.18 - Notes
A note can be added simply by adding the note tag shown below.
{{note:Example of text for a note.}}
The note will appear to the right of the image in a bordered box as shown.
10.2.19 - Other Formatting & HTML Elements
GitHub uses Jekyll pages. It will process certain characters in an undesirable way. In a future version of pagebuilder I will try to automate this process. For now if you have any of the following characters you can use their HTML element so they are displayed correctly.
{ = {
} = }
[ is for [
] is for ]
< is for <
> is for >
Blank lines can be used as spacers
10.2.20 - Comments
Wrye Text will allow a variation of C Language type comments. Comments will not be output to the final HTML file for the Wiki. Useful for remembering information you don't need to end up in the Wiki itself.
Allowed Syntax
/*
 comment goes here
*/
OR
/* comment goes here */
Comments inside of <pre> or preformatted text elements will not be treated as a comment. For now both single and multi line comments require a trailing */ or the HTML will not be generated properly.
Invalid Syntax
// This is a single line comment
OR
* This is a bullet of something
* This is a link to a mod // This is a comment after the link
10.2.21 - Images
I apologize for the rather cryptic way of doing this. I needed something easy to work with that didn't require a ridiculous amount of code.
10.2.22 - Adding an Image
The syntax for an image requires the name of the file and alternate text if the image is not showing.
Example syntax for an Image
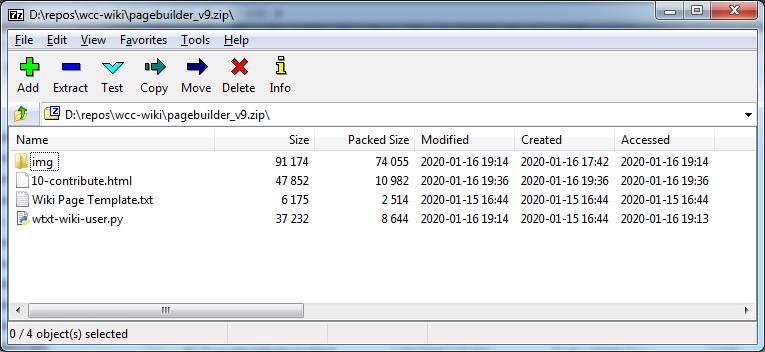
{{image:pagebuilder.jpg | Page Builder Image}}
Example of an Image
10.2.23 - Adding an Image with a Caption
The syntax for an image with a caption requires the name of the file, alternate text, and a caption. The box for the caption will be the width of the image and will wordwrap.
Example syntax for an Image with Caption
{{image-caption:pagebuilder.jpg | Page Builder Image | This is what the zip looks like}}
Example Image with a Caption
10.2.24 - Adding an Image with Caption and Hyperlink
The syntax for an image with a caption and a hyperlink will require five elements. The name of the file, alternate text, and a caption. In addition to that you need two elements for the hyperlink, the hyperlink itself and a name for the link. The box for the caption will be the width of the image and will wordwrap. The link will appear under the caption and will not be the width of the image.
Example syntax Image with a Caption and Hyperlink
{{image-cap-url:pagebuilder.jpg | Page Builder Image | This is what the zip looks like | pagebuilder_v21.zip | Page Builder Zip}}
Example Image with Caption and Hyperlink
10.2.25 - Adding an inline Image
You can use small inline images between  text.
text.
 You can also use a small icon at the beginning of a sentence using the inline image Wrye Tag.
Keep in mind you would want to use small images about 24 to 36 pixels or less. Using large inline  images will look silly.
Example syntax for an inline image
{{inline:96px | wrye_monkey_96.png | Page Builder}}
Example of an inline image
Wrye's Avatar
10.3 - Versions
10.3.1 - 21.00 Update [2/18/2020]
• released pagebuilder_v21.zip version 21
• Added Tooltip Text
• Added Link Titles
10.3.2 - 20.00 Update [1/27/2020]
• released pagebuilder_v20.zip version 20
• More updates to how a paragraph is handeled.
• An em dash is now represented by using -em- instead of two -- hyphens.
This was to fix converting a hyperlink with two -- into an em dash.
• More adjustments to how hyperlinks are handeled. Removed replacement for www. because I don't think websites start with only that anymore.
10.3.3 - 19.00 Update [1/26/2020]
• released pagebuilder_v19.zip version 19
• More updates to hyperlink functions.
10.3.4 - 18.00 Update [1/25/2020]
• released pagebuilder_v18.zip version 18
• Fixed bug when compressing an internal link.
• Added additional note syntax. See Notes
10.3.5 - 17.00 Update [1/25/2020]
• released pagebuilder_v17.zip version 17
• Updated Regex for various thins to capture the text more accurately.
• Updated link generation. (Provided it is valid to begin with)
• Updated header renumbering to use altered header text instead of original text.
from when it was first captured.
16.00 Update [1/25/2020]
• released pagebuilder_v16.zip version 16
• Remove and assign color better for links.
• Handle Paragraphs Better.
• Provide more control for Preformatted Blocks.
15.00 Update [1/24/2020]
• released pagebuilder_v15.zip version 15
• Fixed bug in page auto renumbering when there is no number prefix for the filename.
14.00 Update [1/22/2020]
• released pagebuilder_v14.zip version 14
• Updated builder to auto renumber page.
• Numbering is based on the number prefix of the file name.
13.00 Update [1/21/2020]
• released pagebuilder_v13.zip version 13
• Added syntax for Navigation Buttons.
12.00 Update [1/19/2020]
• released pagebuilder_v12.zip version 12
• Updated builder for Table Of Contents
11.00 Update [1/18/2020]
• released pagebuilder_v11.zip version 11
• Added navigation anchor see ExtraNavigation
10.00 Update [1/18/2020]
• released pagebuilder_v10.zip version 10
• Removed max-width from images except inline images
9.00 Update [1/17/2020]
• released pagebuilder_v9.zip version 9
• Added image Wrye Tags see Images
• Updated CSS for user page builder
8.00 Update [1/16/2020]
• released pagebuilder_v8.zip version 8
• Updated CSS to reflect changes
• Added Pagetitle to Pseudo Page Header
7.00 Update [1/15/2020]
• released pagebuilder_v7.zip version 7
• Added a Blockquote Tag see Blockquote
• Font and Code tags at the start of a line were not assigned a paragraph marker and thus not indenting.
6.00 Update [1/11/2020]
• released pagebuilder_v6.zip version 6
• Alter spoiler button to expand its width when there is more text
5.00 Update [1/11/2020]
• released pagebuilder_v5.zip version 5
• Fixed a bug in changing color for Internal Links
4.00 Update [1/10/2020]
• released pagebuilder_v4.zip version 4
• Added Spoiler Tags see SpoilerTags
3.00 Update [1/10/2020]
• released pagebuilder_v3.zip version 3
• Added C Language type comments see Comments
2.00 Update [1/8/2020]
• released pagebuilder_v2.zip version 2
• Only the site CSS will be used to illustrate what the finished HTML should look like. Removed the ability to use alternate CSS for end user.
1.00 Update [1/7/2020]
• released pagebuilder_v1.zip version 1
• This version has a new file in it wtxt-wiki-user.py. That is the file you will use if you want to see what your page will look like once converted to use on the website.
0.00 Initial Release [1/1/2020]
• released pagebuilder.zip version 0
10.4 - Optional Requirement
• To generate the HTML files you will need the latest python from Python.org. These files are written for 2.7.x and the current Python 2.7.17 will work just fine. The link is for the 32 bit version. Please download that because the setup will go smoother and add needed configurations to your computer to run the python scripts provided.
• Below is a link to Python 2.7.17 and a link to the pagebuilder script and sample file you can generate right away to see it working.
10.4.1 - Python Installation
10.4.2 - Where are the files I just downloaded?
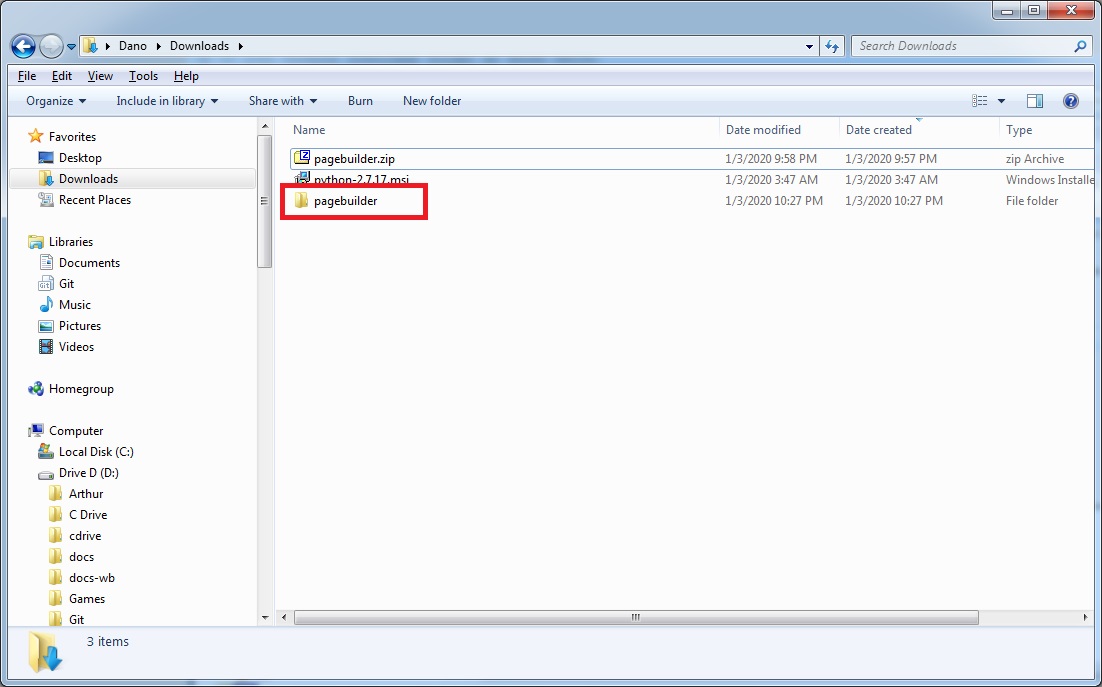
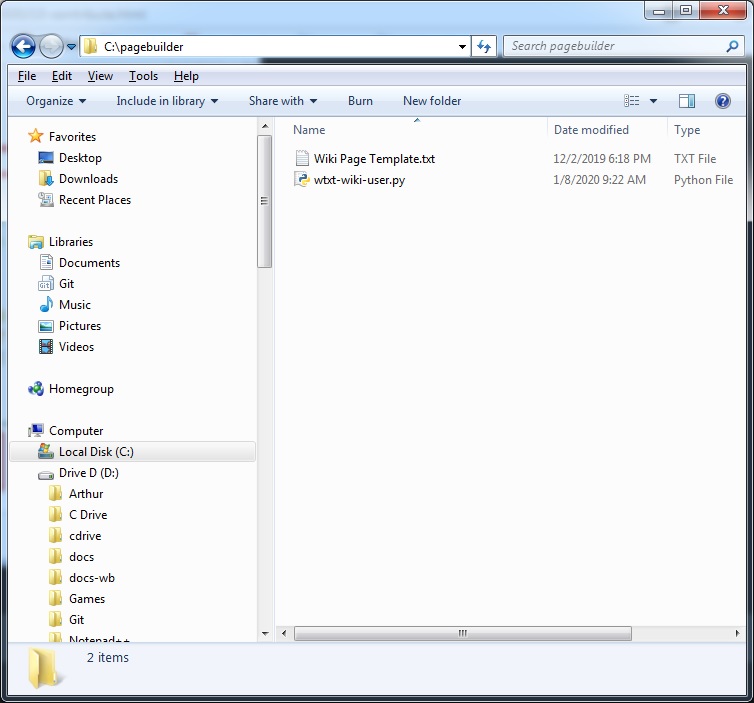
• The files usually end up in your windows Downloads folder as shown below.
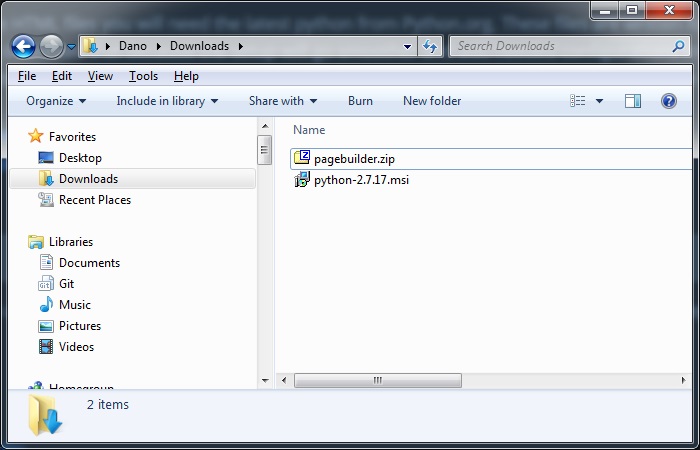
• Open your windows explorer and on the left navigate to your Downloads folder.
• First you will install Python and then be shown where to put the Python scripts and example files.
10.4.3 - Installing Python
• Your version of python will be different then show here. What is important is the install location. Leave it at the default settings so that you can follow the instructions for building HTML files with Python.
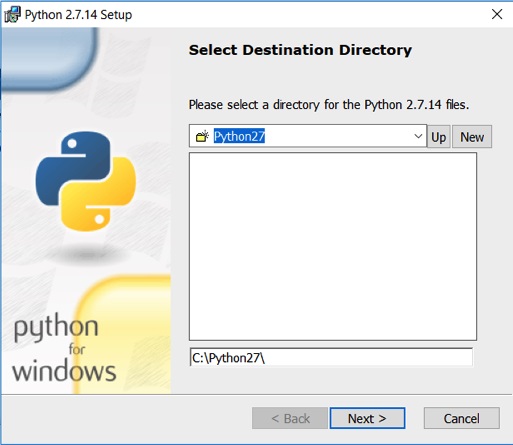
• The Python installation will be very simple, just click next and leave all the default settings.
10.4.4 - Installing Python script for use
• Once installed Python you will need to unzip the python script and sample text file used to build the html file.
• These are really not installed on your system automatically so we will be copying them.
• Windows should have a way to open this type of zip file itself but if needed you can download 7zip from 7-zip.org. It is safe, free and, easy to use.
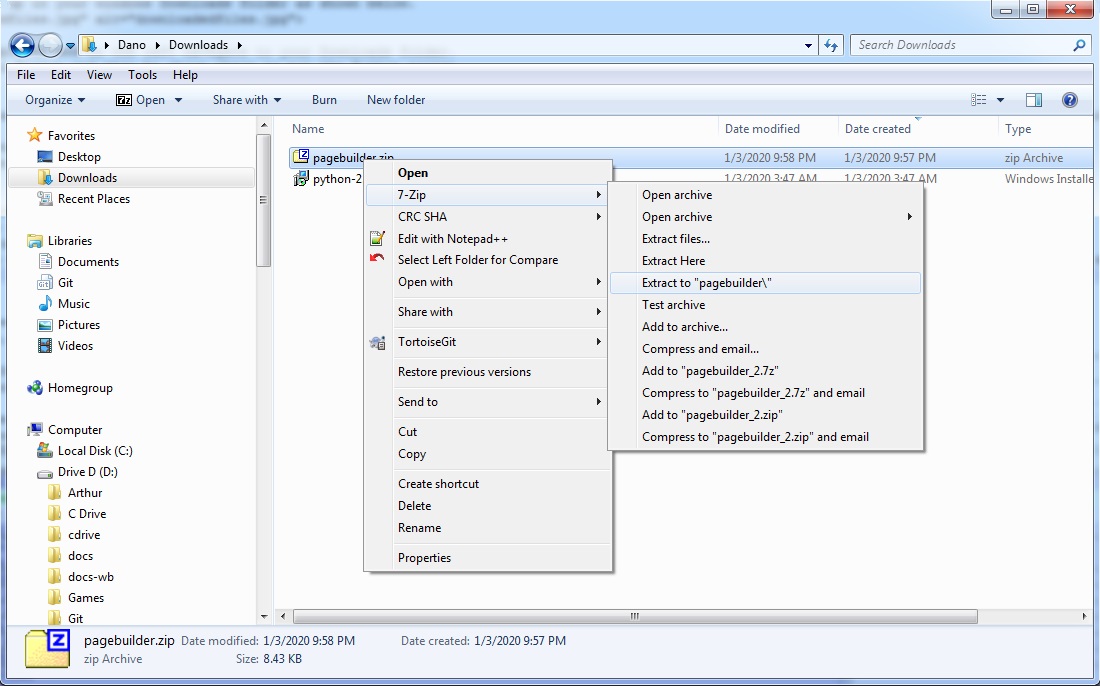
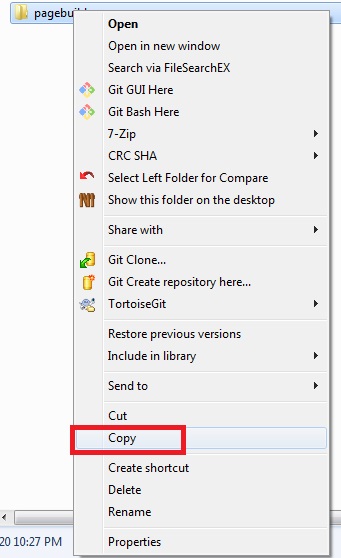
• To unzip file files simply right click on them and choose Extract to "pagebuilder\"
• Now we will be copying the files to a more convenient location to run them easily. If left in the Downloads folder or copied onto the Desktop to run the script means you will have to type in command similar to this. C:\Python27\python.exe C:\Users\[username]\Downloads\pagebuilder\wtxt-wiki-user.py genHtml "Wiki Page Template.txt". While not difficult we will simplify that some to make it easier.
• Right click the pagebuilder folder and, choose Copy
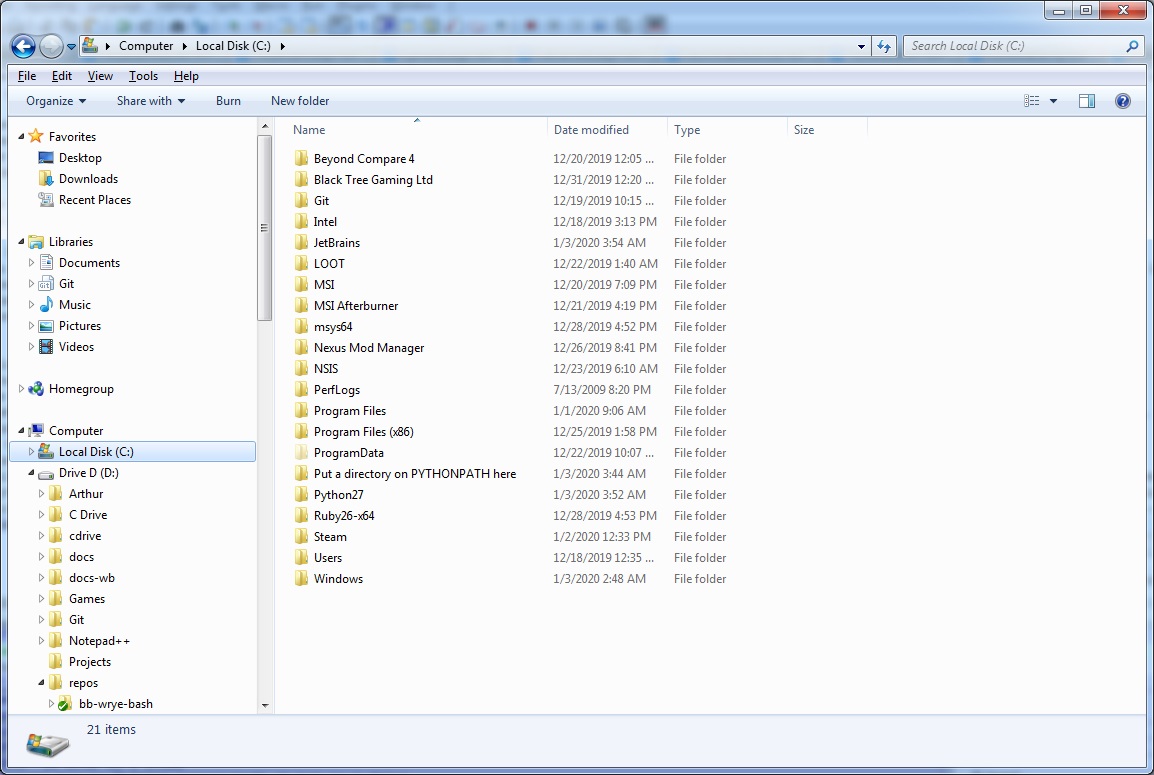
• Navigate to the C Drive
• Right click in an empty space and, choose Paste.
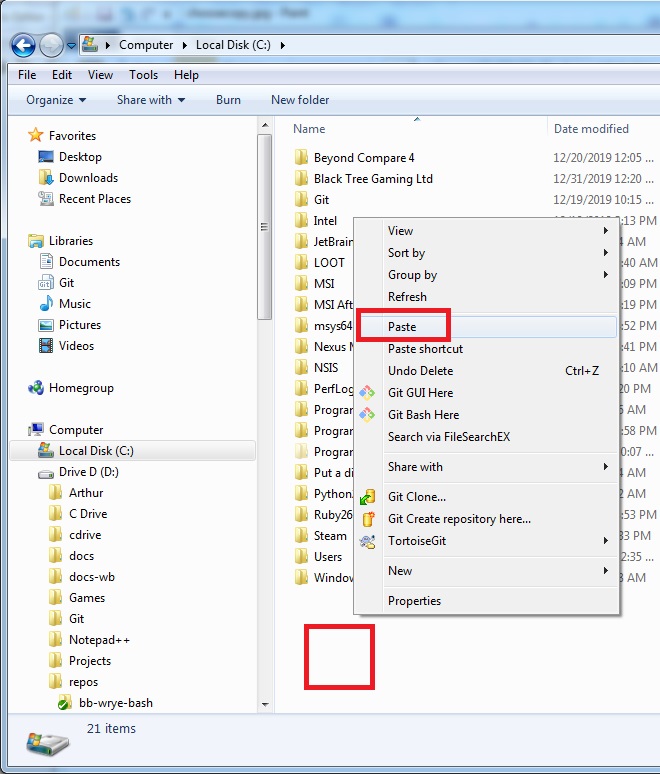
• Once copied to the C: drive double click the pagebuilder folder and you should see the example file and the Python script
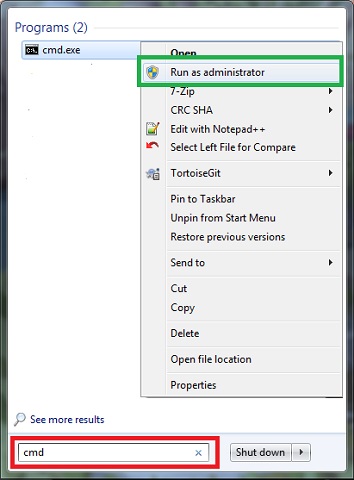
• To run python and process the example file you need to open a command prompt since Python does not have its own GUI interface.
Type cmd in the red box, and right click cmd.exe and choose "Run As Administrator" as shown in the green box.
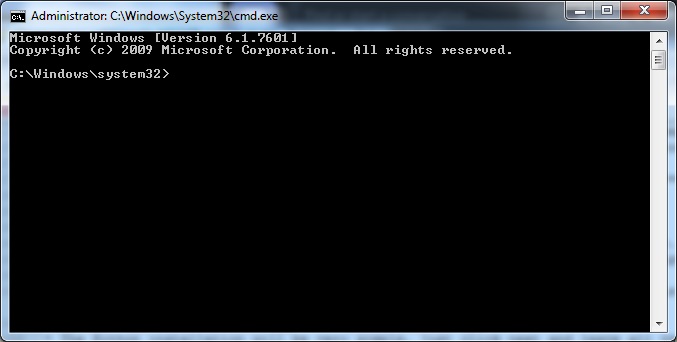
Which will look like this once it's open
As mentioned we needed to put that folder somewhere so that there would be less typing.
As shown type cd c:\pagebuilder and press [ENTER]

Now we will run the python script to produce a sample HTML output so you can see a close version of what will be in the wiki.
As shown type c:\python27\python.exe wtxt-wiki-user.py genHtml "Wiki Page Template.txt" and press [ENTER]
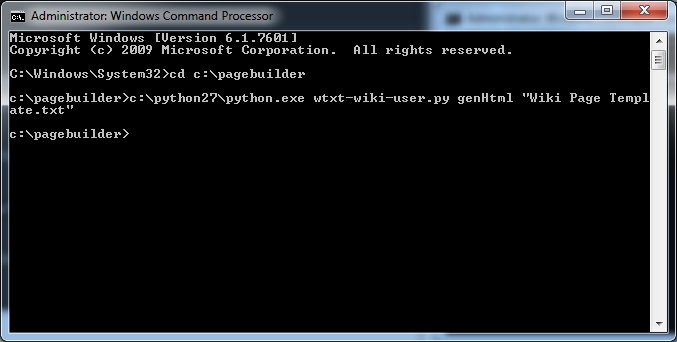
There were no errors and now Wiki Page Template.html appears in the pagebuilder folder.
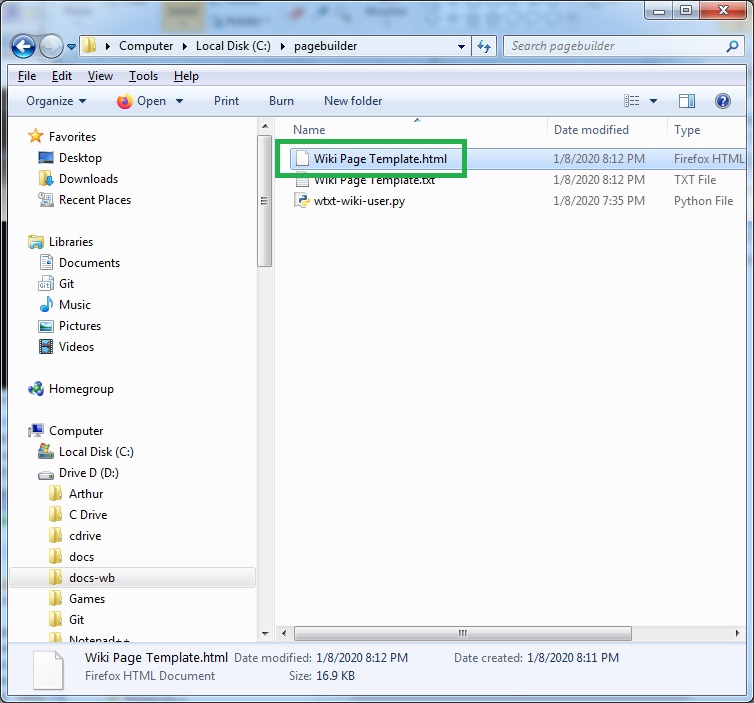
Double click Wiki Page Template.html and you will see more or less what the page would look like.
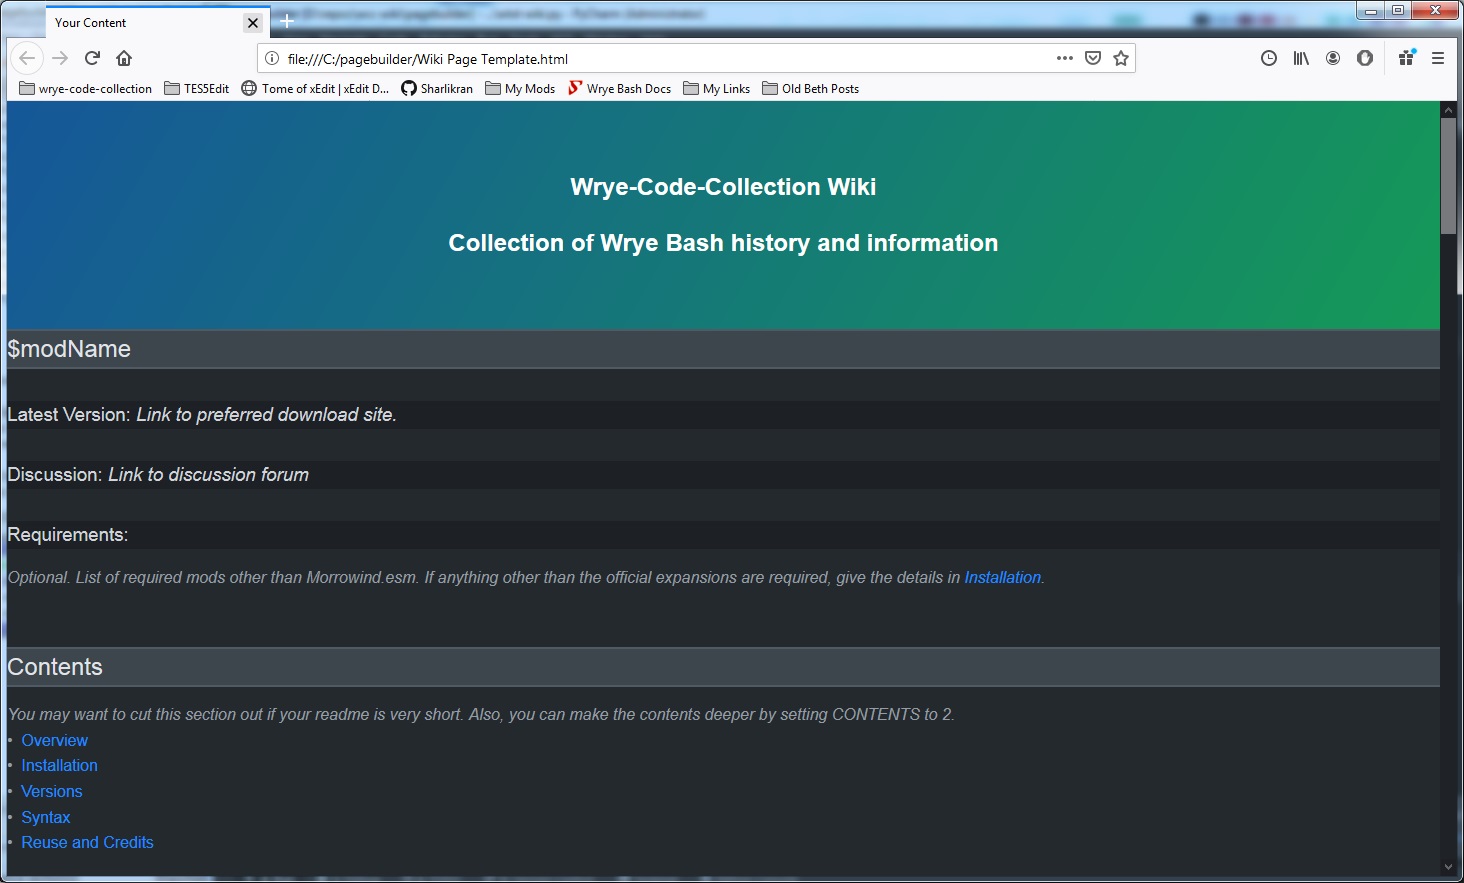
Add the content you wish to add, regenerating the HTML as you go and, you are on your way to producing content for the wiki.
10.5 - Reuse and Credits
10.5.1 - License: WML 1.0 Modify and Redistribute, Share Alike
• You are free to redistribute this work in unmodified form.
• You are free to modify and re-distribute this work, so long as you: 1) give the author(s) credit proportional to their contribution to the final work, 2) distribute the final work under the same terms, and 3) make artistic resources included with the final work available under these same terms.
10.5.2 - Credits
• Wrye, for creating this markdown language